Draw Annotation Tools
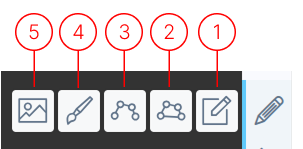
Note Annotation
Section titled “Note Annotation”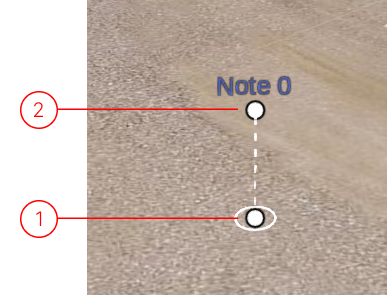
When editing a Note, you have two controls on the 3d view. These controls are denoted by the white dots. Click and drag either dot to make the following modifications. These controls are only available on Note creation and when editing.
-
The bottom point controls the position of the note along the surface of the asset. The point has to lie on the asset surface. It cannot be placed in mid air.
-
The top point is the leader line extension.
The following are the sidemenu options available.
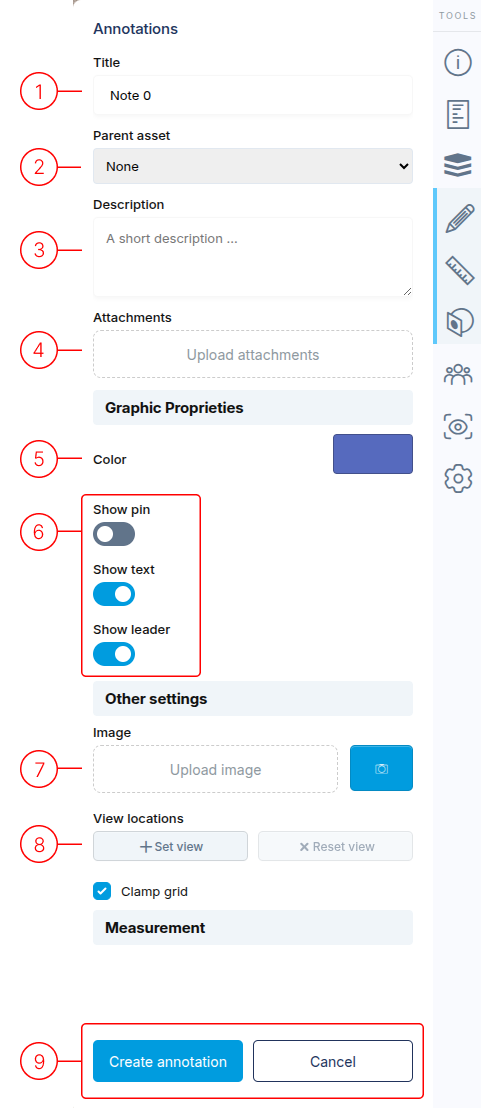
1. Title
Section titled “1. Title”The name of the Note annotation. The systems automatically generates a title when a Note annotation is created.
2. Parent Asset
Section titled “2. Parent Asset”You can assign the Note annotation to a specific asset, or to None (which is the default)
3. Description
Section titled “3. Description”You can enter description information for the Note annotation.
4. Attachments
Section titled “4. Attachments”You can add attachments to the Note annotation. Most file formats are accepted.
5. Color
Section titled “5. Color”Select the color of the text. Clicking on the color rectangle opens the color selection menu.
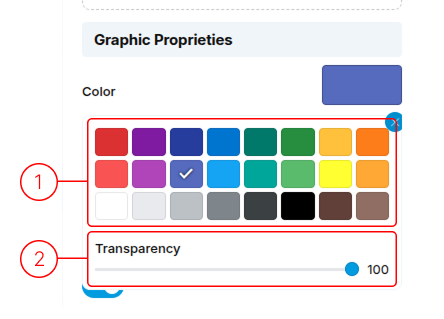
- Select from the color options.
- Adjust the opacity of the text.
6. Parts of the Note Annotation
Section titled “6. Parts of the Note Annotation”The following toggles control the visibility of various parts of the Note annotation.
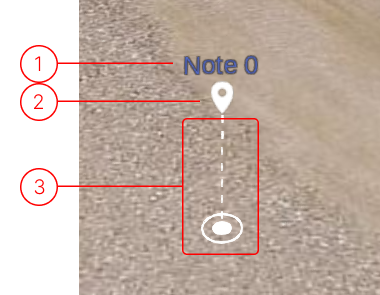
1. Text The “Show Text” toggle the visibility of the “Text” portion of the annotation.
2. Pin The “Show Pin” toggle controls the visibility of the “Pin” portion of the annotation.
3. Leader The “Show leader” toggle controls the visibility of the “Leader” portion of the annotation.
7. Image upload
Section titled “7. Image upload”Each annotation can contain a features image. This image will be displayed in the annotation list.
8. View Location
Section titled “8. View Location”Set the view you want for when the View annotation is clicked.
9. Save/Cancel
Section titled “9. Save/Cancel”Select if you want to create/update the annotation or Cancel. Cancelling will lose all changes.
Polygon Annotation
Section titled “Polygon Annotation”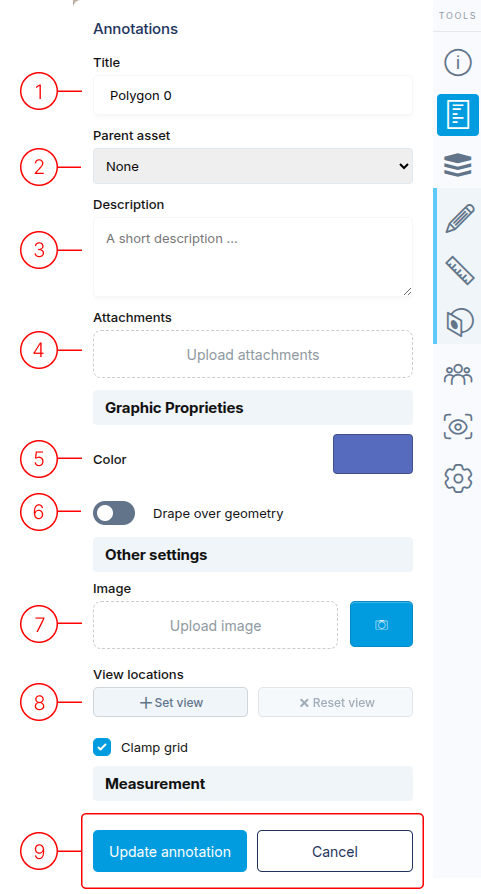
1. Title
Section titled “1. Title”The name of the Polygon annotation. The systems automatically generates a title when a Polygon annotation is created.
2. Parent Asset
Section titled “2. Parent Asset”You can assign the Polygon annotation to a specific asset, or to None (which is the default)
3. Description
Section titled “3. Description”You can enter description information for the Polygon annotation.
4. Attachments
Section titled “4. Attachments”You can add attachments to the Polygon annotation. Most file formats are accepted.
5. Color
Section titled “5. Color”Select the color of the text. Clicking on the color rectangle opens the color selection menu.
- Select from the color options.
- Adjust the opacity of the text.
6. Drape over geometry
Section titled “6. Drape over geometry”The following toggle controls how the polygon interacts with the asset.
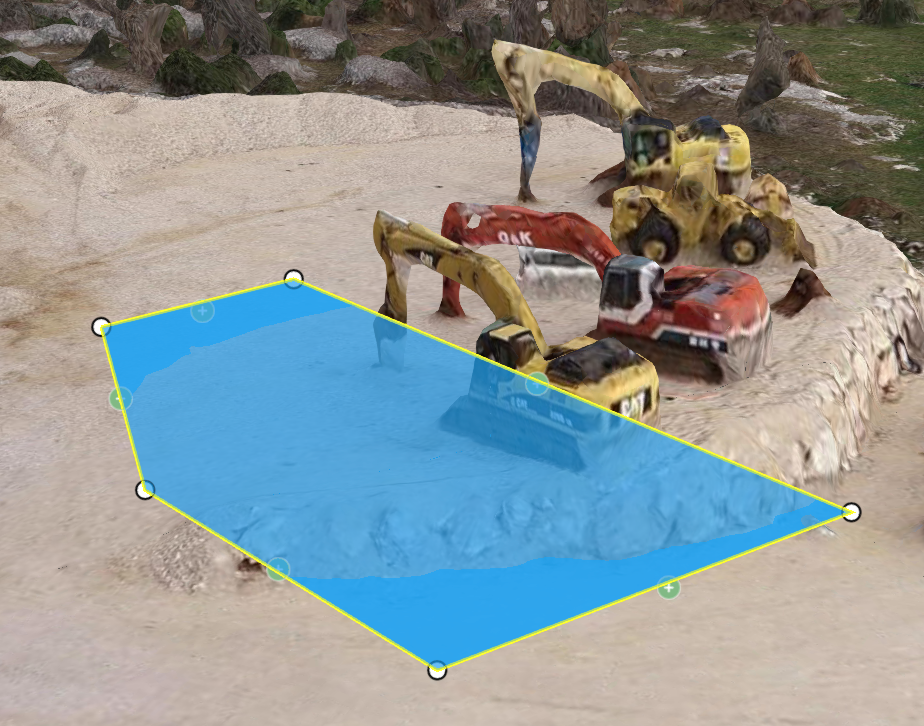 Drape over geometry is off
The surface of the polygon is a flat surface joining all the edges. The polygon edges are straight and directly connect the vertex points in straight lines.
Drape over geometry is off
The surface of the polygon is a flat surface joining all the edges. The polygon edges are straight and directly connect the vertex points in straight lines.
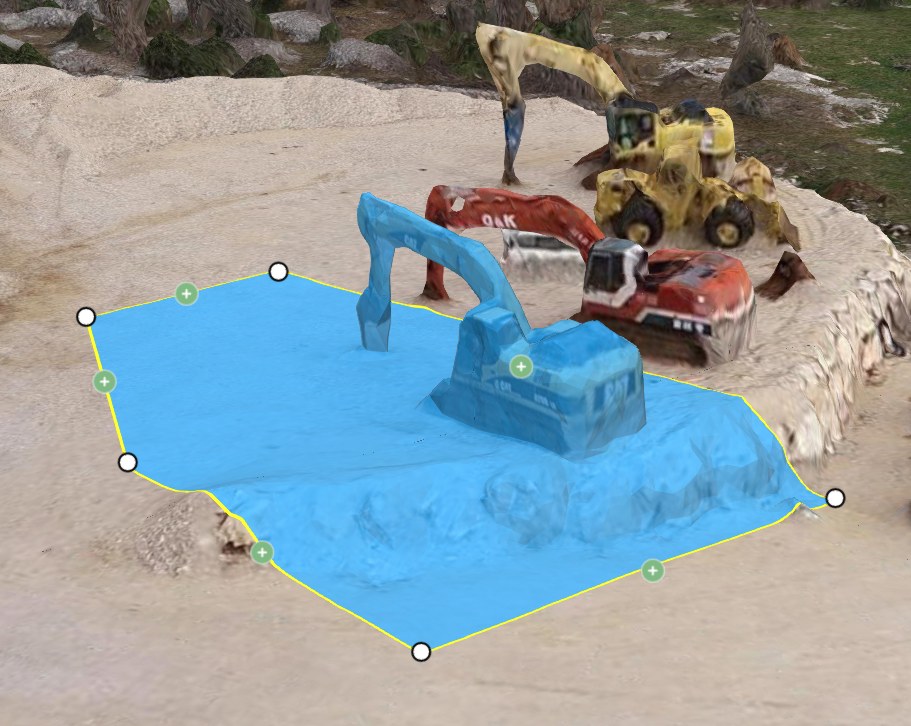 Drape over geometry is on
The surface of the polygon colors the asset surface. The edges follow the surface of the asset surface.
Drape over geometry is on
The surface of the polygon colors the asset surface. The edges follow the surface of the asset surface.
7. Image upload
Section titled “7. Image upload”Each annotation can contain a features image. This image will be displayed in the annotation list.
8. View Location
Section titled “8. View Location”Set the view you want for when the View annotation is clicked.
9. Save/Cancel
Section titled “9. Save/Cancel”Select if you want to create/update the annotation or Cancel. Cancelling will lose all changes.
Polyline Annotation
Section titled “Polyline Annotation”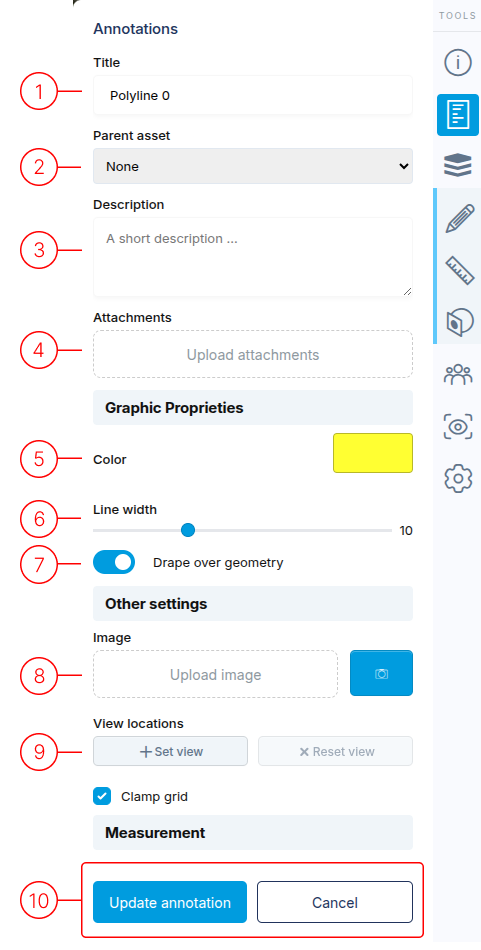
1. Title
Section titled “1. Title”The name of the Polyline annotation. The systems automatically generates a title when a Polyline annotation is created.
2. Parent Asset
Section titled “2. Parent Asset”You can assign the Polyline annotation to a specific asset, or to None (which is the default)
3. Description
Section titled “3. Description”You can enter description information for the Polyline annotation.
4. Attachments
Section titled “4. Attachments”You can add attachments to the Polyline annotation. Most file formats are accepted.
5. Color
Section titled “5. Color”Select the color of the text. Clicking on the color rectangle opens the color selection menu.
- Select from the color options.
- Adjust the opacity of the text.
6. Line Width
Section titled “6. Line Width”Controls the width of the polyline.
7. Drape over geometry
Section titled “7. Drape over geometry”The following toggle controls how the polygon interacts with the asset.
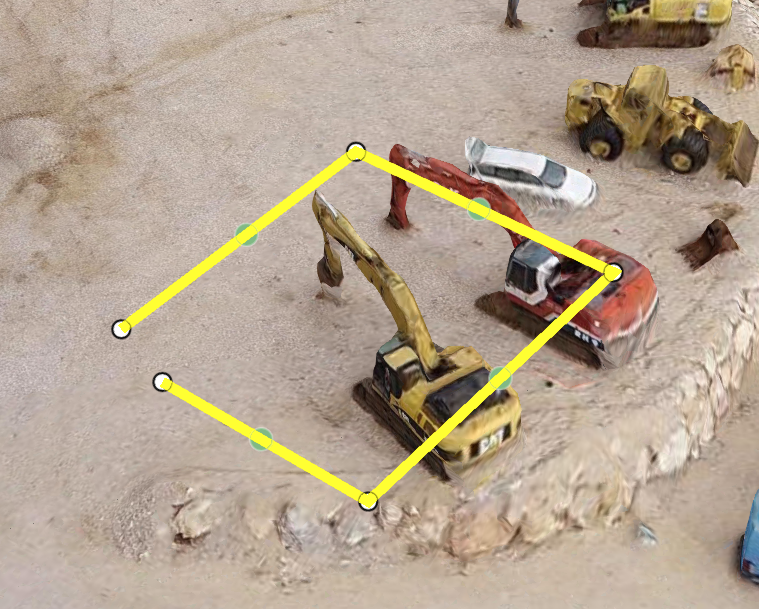 Drape over geometry is off
The polyline edges are straight and directly connect the vertex points in straight lines.
Drape over geometry is off
The polyline edges are straight and directly connect the vertex points in straight lines.
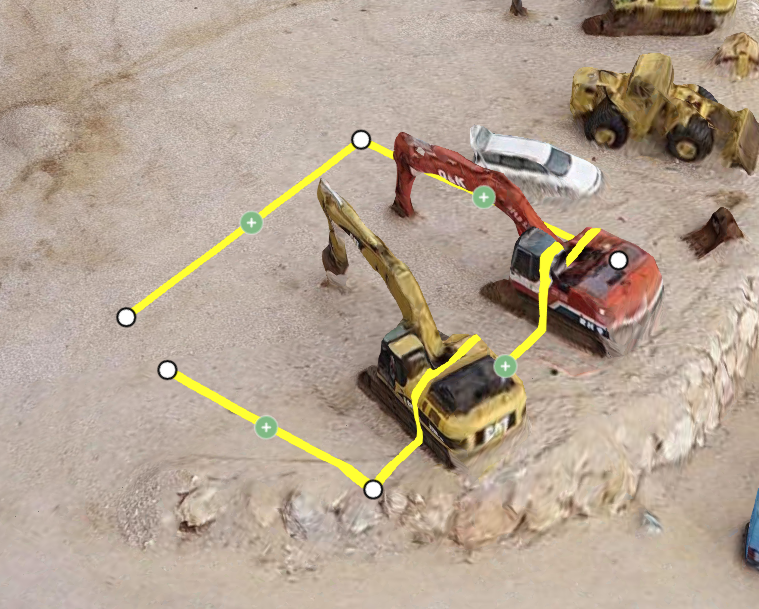 Drape over geometry is on
The polyline edges follow the surface of the asset surface. The edges are also hidden behind asset elements.
Drape over geometry is on
The polyline edges follow the surface of the asset surface. The edges are also hidden behind asset elements.
8. Image upload
Section titled “8. Image upload”Each annotation can contain a features image. This image will be displayed in the annotation list.
9. View Location
Section titled “9. View Location”Set the view you want for when the View annotation is clicked.
10. Save/Cancel
Section titled “10. Save/Cancel”Select if you want to create/update the annotation or Cancel. Cancelling will lose all changes.
Freehand Paint Annotation
Section titled “Freehand Paint Annotation”The paint tool allows for freestyle drawing on any surface of the asset.
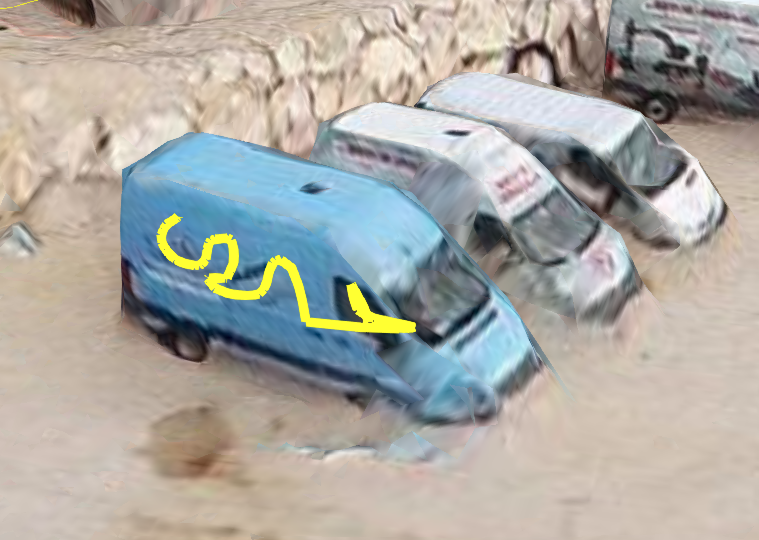
These are the options in the side menu for the Paint tool.
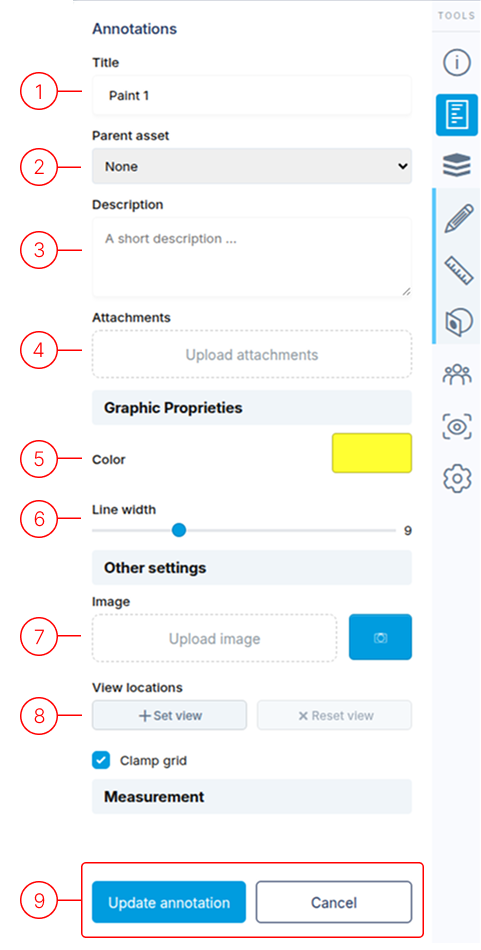
1. Title
Section titled “1. Title”The name of the Freehand Paint annotation. The systems automatically generates a title when a Freehand Paint annotation is created.
2. Parent Asset
Section titled “2. Parent Asset”You can assign the Freehand Paint annotation to a specific asset, or to None (which is the default)
3. Description
Section titled “3. Description”You can enter description information for the Freehand Paint annotation.
4. Attachments
Section titled “4. Attachments”You can add attachments to the Freehand Paint annotation. Most file formats are accepted.
5. Color
Section titled “5. Color”Select the color of the text. Clicking on the color rectangle opens the color selection menu.
- Select from the color options.
- Adjust the opacity of the text.
6. Line Width
Section titled “6. Line Width”Controls the width of the paint line.
7. Image upload
Section titled “7. Image upload”Each annotation can contain a features image. This image will be displayed in the annotation list.
8. View Location
Section titled “8. View Location”Set the view you want for when the View annotation is clicked.
9. Save/Cancel
Section titled “9. Save/Cancel”Select if you want to create/update the annotation or Cancel. Cancelling will lose all changes.