Info
Info side menu
Section titled “Info side menu”This side menu displays details about the asset:
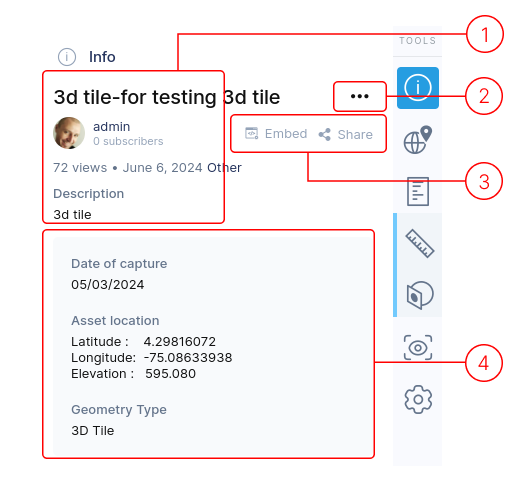
1. General
Section titled “1. General”This section provides high-level information:
- Title
- Asset owner
- Number of views, upload date, and tags list
- Description
2. Asset Edit
Section titled “2. Asset Edit”The ellipsis expands to show two options:
- Edit Asset: Opens the side menu panel for editing all user-entered asset details. (See Asset Details Editor below)
- Delete Asset: Removes the asset from the platform.
3. Sharing Options
Section titled “3. Sharing Options”-
Embed: Opens a window with code you can copy and paste into your website. This code displays the asset in a window on your webpage. Adjust
widthandheightvalues for desired size.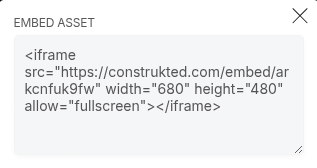
-
Share: Opens a window with social network buttons to post your asset link. You can also copy the asset URL directly into your favorite social network.

-
Download: If enabled, users can download the asset via an icon displayed here.
4. Additional Asset Metadata
Section titled “4. Additional Asset Metadata”The information in this area varies by asset type and user-provided details:
- For geo-referenced assets, displays location
- For photogrammetry meshes, shows polygon count and texture resolution (sum of pixels across all used texture files)
Asset Details Editor
Section titled “Asset Details Editor”Each asset has a distinct set of details
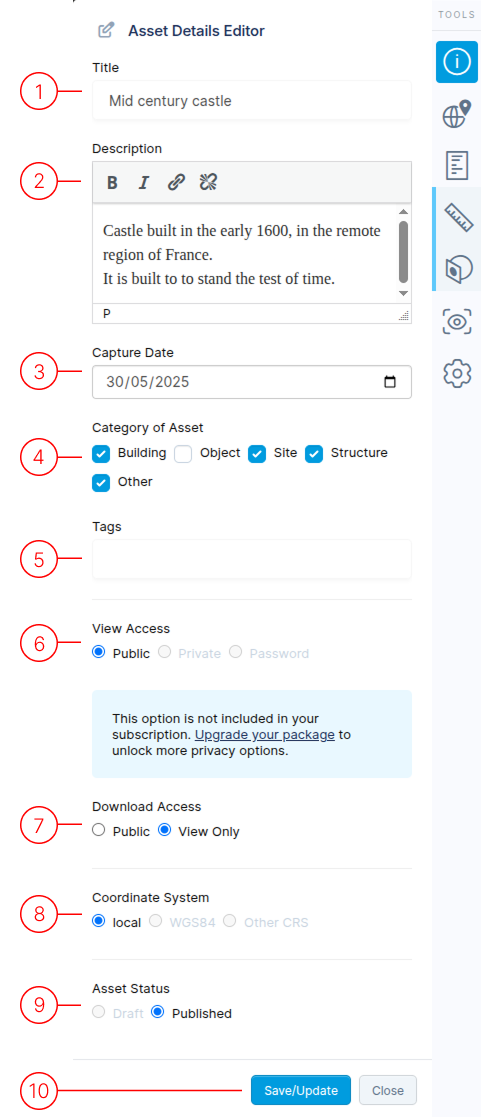
1. Title
Section titled “1. Title”The main name of your asset. This field is initially populated with the filename of your upload.
2. Description
Section titled “2. Description”Add some descriptive text about the asset. You can use bold, italics and you can hyperlink to external links.
3. Date of data capture
Section titled “3. Date of data capture”This field is important to have a record of the capture date of the asset.
4. Asset Category
Section titled “4. Asset Category”What did you scan? This allows for grouping of similar categories of assets.
5. Tags
Section titled “5. Tags”Optional. Add any tags to simplify searching for assets.
6. View Access
Section titled “6. View Access”Choose who can view your asset.
- Public: Asset will be listed in the public gallery. Anyone with the link can view the asset. (DEFAULT SETTING)
- Private: Asset will NOT be listed in the public gallery. Anyone with the link can view the asset.
- Password: Asset will NOT be listed in the public gallery. Anyone with the link also needs a password to view the asset.
7. Download Access
Section titled “7. Download Access”You can allow your original data to be downloaded by anyone who can view the asset.
- Public: Anyone can download the original source file.
- View Only: Original source files cannot be downloaded.
8. Coordinate System
Section titled “8. Coordinate System”This section is for information purposes. It cannot be modified. It reflect the CRS of the asset at the time of upload.
9. Asset status
Section titled “9. Asset status”When a dataset is first uploaded, the asset status is set to Draft. In draft mode, the asset is not accessible by anyone outside of owner, the even if they have the URL. Setting the asset status to Published will make the asset accessible as per the View Access settings.
10. Save/Update/Close
Section titled “10. Save/Update/Close”Finish the editing of the asset details.