Annotation Manager
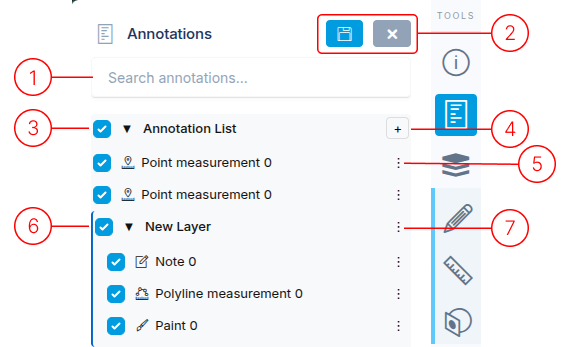
The Annotations Manager serves as the central location to manage all annotations and measurements created in the Project Workspace. Annotations refer to items created as draw annotations created with “draw” tools and measurements taken using the “measure” tools. For better organization, group measurements into layers using the [ + ] button (see item 3) and drag individual measurements into new layers.
1. Search
Section titled “1. Search”The search field allows searching for any text within the annotation list.
2. Organization changes
Section titled “2. Organization changes”These buttons only appear when there is a change in the annotation list created by adding new Layers or rearranging the contents. Save icon - Save changes X icon - Discard changes
3. Annotation list
Section titled “3. Annotation list”This is the top-level container for all annotations, where you can view and manage your annotation items.
- The checkmark controls the visibility of the annotation
- Clicking on the annotation text will move the camera to the annotation.
4. Add Layer
Section titled “4. Add Layer”The [ + ] button creates new layers. Layers and annotations can be dragged within the list for better organization.
5. Annotation item options menu
Section titled “5. Annotation item options menu”Each annotation has a menu with three options:
- Edit: Opens the annotation details panel.
- View: Centers the camera on the annotation.
- Delete: Removes the annotation from the list.
6. Layer
Section titled “6. Layer”Layers help organize multiple annotations. They can be collapsed or expanded using the triangle icon next to the layer name.
7. Layer item options menu
Section titled “7. Layer item options menu”Layers have two menu options:
- Rename: Edit the layer name.
- Delete: Remove the layer (annotations will move to the main annotation list).