
Asset Manager
The Asset Manager is a tool used to manage all assets displayed within the Project Workspace.
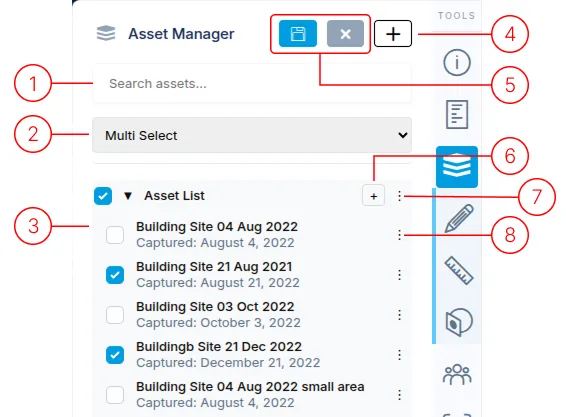
1. Search
Section titled “1. Search”The search field allows for filtering the asset list for any text entered.
2. Multi-asset view
Section titled “2. Multi-asset view”The Asset Compare selector becomes available once two or more assets are added to the Project Workspace.
3. Asset list
Section titled “3. Asset list”This is the top-level container for all assets in the project. The checkmark toggles the asset visibility in the Project Workspace.
4. Asset Selection
Section titled “4. Asset Selection”This button opens the asset selection menu. See below for details
5. Add Folder
Section titled “5. Add Folder”The [ + ] button adds a folder to the asset list. The folder can be used to organize large numbers of assets.
6. Folder
Section titled “6. Folder”Folders group assets in the list. Expand or collapse a folder to show or hide its entries.
7. Folder options menu
Section titled “7. Folder options menu”- Rename: Edit the folder name.
- Delete: Remove the folder (Assets will move to the main asset list).
8. Asset item options menu
Section titled “8. Asset item options menu”Each asset has a menu with two options:
- Zoom to: Centers the camera on the individual asset.
- Remove: Removes the asset from the list.
Asset Selection
Section titled “Asset Selection”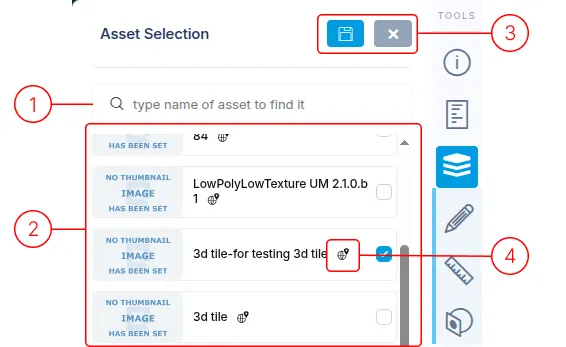
1. Search
Section titled “1. Search”Filter the list for assets matching the text entered in the search field.
2. Asset list
Section titled “2. Asset list”This is a list of all the assets in your account.
3. Organization changes
Section titled “3. Organization changes”These buttons control what happens when you are done.
- Save icon - Save changes
- X icon - Discard changes
4. Geo-location icon
Section titled “4. Geo-location icon”This icon identifies an asset as having geo-reference information, which makes it a candidate for selecting multiple assets inside the project workspace.
Asset Compare
Section titled “Asset Compare”The Asset Compare modes are used for viewing the loaded assets in various modes.
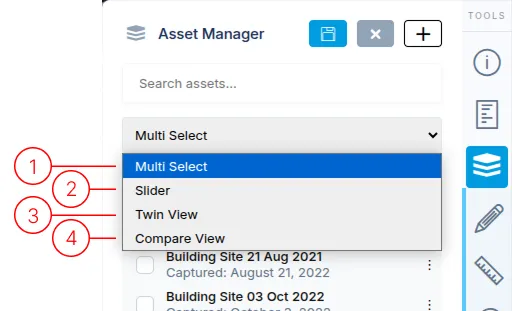
The Asset Compare selector has 4 options:
1. Multi Select
Section titled “1. Multi Select”This is the default view mode. It allows you to use the checkmark besides each asset to toggle visibility of each asset individually.
2. Slider
Section titled “2. Slider”This mode provides a slider that allows you to switch between assets by dragging it. Only one asset is displayed at a time. The order of the display is based on how you ordered the assets in the list.
3. Twin View
Section titled “3. Twin View”This mode renders two viewports side by side, each showing the same scene. Camera movement is synchronized between them: pan, rotate, or zoom in one viewport and the other follows. The Asset List displays two check boxes per asset. The left/right check boxes control which assets are displayed in the left/right viewport, so each side can show a different asset (or combination) from the same camera position. Drag the divider handle to resize the viewports.
4. Compare View
Section titled “4. Compare View”This mode uses a single viewport with a vertical split line across it. Drag the handle on the line left or right to move the split through the scene. The Asset List displays two check boxes per asset. The left/right check boxes control which assets are displayed on each side of the line, letting you sweep the split across the scene to compare assets in place.